
Products >> Online Help >> Media Client User Manual
Media Client User Manual
Content
1. Introduction
2. Main window overview
3. Quick start
4. Opening media
5. Per-channel controls
6. Multi-window layouts
7. Video wall
8. Full screen
9. Snapshot
10. Recording
11. System settings
12. Media information
13. Connection status and auto-reconnect
14. Configuration and logs
15. Keyboard and mouse shortcuts
16. Frequently asked questions
1. Introduction
Happytime Media Client is a desktop multi-window video surveillance/playback application. It can play live streams and local media files simultaneously in a multi-window grid, supporting RTSP, RTMP, HTTP-FLV, HTTP-MJPEG, SRT and local files. Each channel supports independent snapshot, recording, audio control, full screen and more. It can also spread the channels across several monitors as a video wall (§7).
2. Main window overview
The main window ("Happytime media client V4.4") consists of:
Video grid — a multi-window layout holding one or more playback channels (default 2×2 = 4 windows).
Bottom toolbar — icon buttons for global operations.
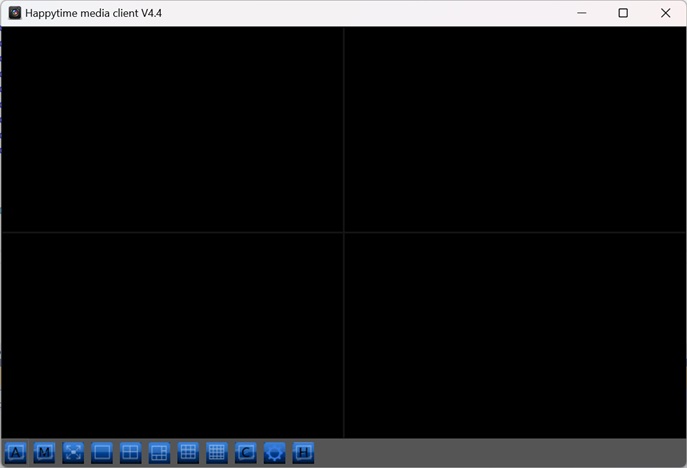
Toolbar buttons :
 : Stop all videos — stop/close the video in every channel.
 : Mute all videos — mute the audio of every channel.
 : Full screen — switch the whole grid to full screen (press
 Esc to exit).
 /
/  /
/  /
/  /
/  : Switch to the 1, 4, 6, 9 or 16-window grid layout.
 : Custom layout — open the custom layout editor.
 : Video wall — expand the video grid across multiple monitors (see §7); press again to exit the wall.
 : System setting — open the System Settings dialog.
 : Online help — open the online documentation in your browser.
Clicking a channel selects it (highlighted with a purple border). The active cell is the target for operations such as opening media.
3. Quick start
1. Start the application.
2. Click any video window (it becomes the selected cell).
3. Press the center Play button in the floating control bar, or double-click the cell to open the Open Media dialog, as the following:
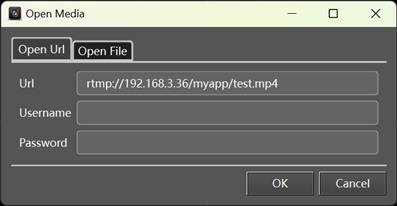
4. Enter a stream URL or select a local file, then click OK.
5. The video begins playing; use the floating control bar to manage playback.
The current layout and every channel's URL are saved automatically when you exit, and restored the next time the application starts.
4. Opening media
Click the center Play button on a channel (or double-click the video surface) to open the Open Media dialog. It has two tabs.
Open File :
File Path — enter a local media file path or click Select to browse.
Supported formats are broad (.mp4, .avi, .mkv, .flv, .ts, .mov, .wmv, .rmvb, .264/.h264/.265/.h265, audio formats such as .aac/.mp3/.wav/.flac,
and many more). Files are decoded with FFmpeg, so other formats may also work.
You can also drag & drop a media file directly onto a video window to play it.
Open Url :
Url — enter the stream address. The URL format is validated; otherwise the message "Invalid URL format!" is shown.
Username / Password — optional authentication (used by RTSP/HTTP).
Supported protocols :
rtsp:// — standard RTSP
rtsps:// — RTSP oer SSL
ws:// / wss:// — RTSP over WebSocket
rtmp://, rtmpt://, rtmps://, rtmpe://, rtmpfp://, rtmpte://, rtmpts:// — RTMP family
http:// / https:// — HTTP-FLV / HTTP-MJPEG (the type is auto-detected)
srt:// — SRT
For http:// / https:// URLs the application probes the server and automatically selects the correct player: RTSP-over-HTTP tunnel, HTTP-FLV, or HTTP-MJPEG.
If a cell already plays a URL, the Open Url tab is shown first for convenience.
5. Per-channel controls
Hovering over a video window displays a floating control bar (semi-transparent) with the following controls, as the following:
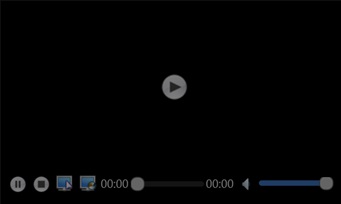
Pause / Play — pause or resume the stream (hidden for SRT streams).
Stop — close the video in this channel.
Mic — RTSP audio backchannel (talk-back) — send microphone audio to the server (RTSP streams only).
Snapshot — capture the current frame as a JPEG image.
Record — start / stop recording this channel to an AVI file.
Elapsed time — playback position, format MM:SS or HH:MM:SS.
Progress bar — shows playback progress; drag to seek (works for local files and RTSP; ignored by live HTTP/RTMP/SRT/MJPEG).
Duration — total duration (0 for live streams).
Volume — mute / unmute toggle.
Volume slider — adjust volume from 0 to 255.
Play (center) — open the Open Media dialog to change the source.
Right-click context menu :
Close Video
Fill the whole window / Keep the original aspect ratio (render mode)
Full Screen / Exit Full Screen
Media information ... — opens the Media Info dialog (video codec, resolution, frame rate, audio codec, sample rate, channels, and the URL).
While the video wall is active (§7), the context menu of every wall cell additionally shows Exit Video Wall at the top (available even on empty cells), and the Full Screen / Exit Full Screen items are hidden — individual
channels on the wall cannot be full-screened.
Mouse / keyboard gestures :
Single click — select the channel.
Double-click — toggle channel full screen (press Esc or double-click again to restore).
Drag & drop a file — play the dropped file in that channel.
Esc — exit full screen.
6. Multi-window layouts
Use the toolbar to switch the video grid:
1, 4, 6, 9, 16 — pre-defined grid layouts. When switching, existing playing videos are kept and re-arranged; windows with no video are removed.
Custom layout
Click Custom Layout to open the editor, as the following:
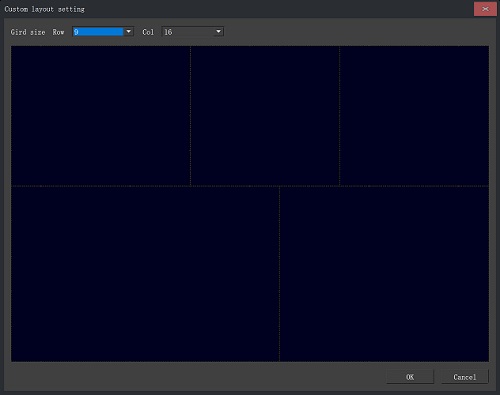
1. Set the Grid size (Rows/Cols, 1–64).
2. Drag on the grid to draw zones (regions).
3. Right-click a zone → Del Zone to remove it; right-click empty space → Clear Zones to remove all.
4. A zone's URL can be set by dragging a stream URL text into it.
5. Click OK to apply the custom layout to the main window.
Layout files
In System Settings → Video window layout you can Save Layout / Load Layout to store and restore the entire grid arrangement (including each cell's URL and credentials) as an XML file.
7. Video wall
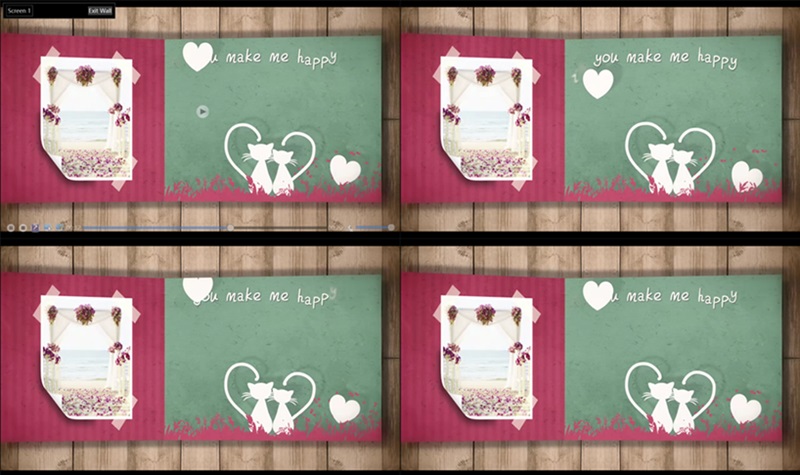
The Video Wall mode expands your existing video windows across multiple physical monitors to build a multi-screen surveillance wall. Each enabled monitor shows its own independent, borderless video grid, and the live channels already opened in the main
window are automatically distributed across the monitors — playback keeps running throughout, as the following:
7.1 Entering video wall mode
1. In the main window, open the channels you want on the wall (arranged in any grid layout).
2. Click the toolbar Video wall button.
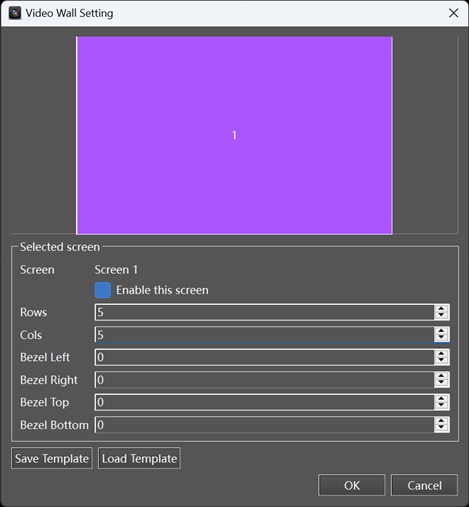
3. In the Video Wall Setting dialog, configure each screen and click OK, as the following:
The main window hides and the wall appears. Live channels are not stopped; they are simply migrated onto the wall.
If you press the Video wall button again while the wall is active, you leave the wall and return to the main window.
7.2 Video Wall Setting dialog
The dialog first shows a schematic of all monitors detected by the operating system. Click a monitor (it is highlighted) to configure it in the Selected screen panel:
Screen : the currently selected monitor number.
Enable this screen : include this monitor in the wall; when unchecked the monitor's other settings are ignored/disabled.
Rows / Cols : number of cells on this monitor's grid (1–5, up to 25 cells per screen).
Bezel Left / Right / Top / Bottom : edge insets in pixels that keep the video cells clear of the monitor bezel/frame.
Buttons: Save Template / Load Template store or restore the complete wall configuration (screens, grid size, bezel) as an XML file; OK applies the configuration and enters the wall; Cancel leaves the main window unchanged.
At least one screen must be enabled, otherwise nothing happens when you click OK. If a template refers to a monitor that is no longer connected, that monitor is skipped.
7.3 What happens to your channels
Channels are distributed to the screens in the order they appear in the main window, filling each monitor's cells first (monitors in ascending order).
If there are more channels than wall cells, the surplus channels keep running but stay hidden; they return automatically when you leave the wall.
Each screen is a borderless window covering the monitor's available working area, with a "Screen N" label and an Exit Wall button in the top-left corner.
7.4 Exiting video wall mode
Any of the following returns you to the main window exactly as it was before entering the wall:
Click the toolbar Video wall button again.
Press Esc.
Click Exit Wall in the top-left corner of any screen.
Right-click any cell on the wall → Exit Video Wall.
While in video wall mode, individual channels cannot be full-screened (double-click full screen is disabled and the Full Screen context-menu items are hidden). The wall configuration itself is not stored automatically — use Save Template to keep it.
8. Full screen
Grid full screen : click the toolbar Full Screen button. The whole video grid expands to fill the screen. Press Esc to exit.
Single channel full screen : double-click a channel. Press Esc or double-click again to restore.
9. Snapshot
1. Set a valid snapshot folder in System Settings → Recording → Snapshot Path (or click the folder button to browse).
2. While a video is playing, click Snapshot in the floating control bar.
3. The current frame is saved as a JPEG file named <stream>_YYYYMMDD_HHMMSSmmm.jpg in the snapshot path (e.g. 192.168.1.10_20260826_153045123.jpg). A confirmation popup shows the saved location.
10. Recording
1. Set a valid folder in System Settings → Recording → Recording Path.
2. During playback, click Record in the floating control bar to start recording; click again to stop.
3. Files are saved as AVI named <stream>_YYYYMMDD_HHMMSSmmm.avi in the recording path.
Recording options in System Settings:
Max recording time (HH:mm:ss) — stop and switch to a new file after this duration. 0 = unlimited.
Max file size (KB) — automatically split the recording into a new AVI file when the size is reached. 0 = unlimited (1 GB default cap).
Supported video codecs for AVI: H.264, H.265/HEVC, MJPEG, MPEG-4; audio: G.711 A-law/μ-law, G.726, G.722, AAC. If the connection drops, the channel auto-reconnects and recording resumes.
11. System settings
Open via the toolbar System Setting button, as the following:
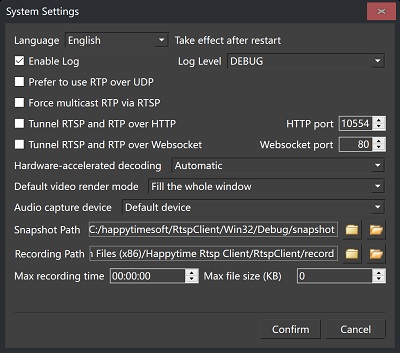
Settings are saved when you click Confirm.
General
Enable Log — turn runtime logging on/off.
Language — System / English / Chinese — takes effect after restart.
Log Level — TRACE / DEBUG / INFO / WARNING / ERROR / FATAL.
Network
Prefer to use RTP over UDP — use RTP-over-UDP for RTSP where possible.
Force multicast RTP via RTSP — request multicast RTP.
Tunnel RTSP and RTP over HTTP — tunnel RTSP through an HTTP proxy, with configurable HTTP port (default 80).
Tunnel RTSP and RTP over Websocket — tunnel RTSP through WebSocket, with configurable Websocket port (default 80).
Playback
Hardware-accelerated decoding — Automatic / platform-specific hardware decoder (Direct3D11, DXVA2, Video Toolbox, MediaCodec, VAAPI, OpenCL) / Disable.
Default video render mode — "Keep the original aspect ratio" or "Fill the whole window".
Audio capture device — select the microphone used for the RTSP backchannel.
Recording
Snapshot Path — where snapshot JPEGs are saved (folder button to browse, open-folder button to view).
Recording Path — where recording AVI files are saved.
Max recording time — automatic file switch after a duration (0 = unlimited).
Max file size (KB) — automatic file switch after a size (0 = unlimited).
Video window layout
Save Layout — save the current grid and all channel URLs to an XML file.
Load Layout — load a previously saved layout.
On Confirm, the application validates that both the snapshot and recording paths exist, otherwise it asks you to correct them.
12. Media information
Right-click a channel → Media information ... to view, as the following:
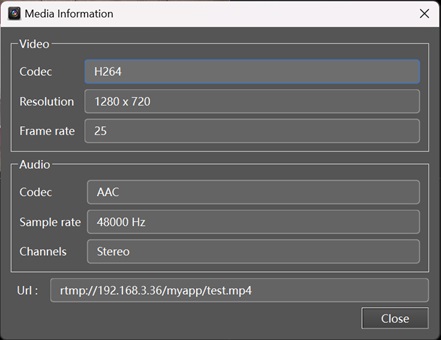
Video : codec (H264 / H265 / MP4 / MJPEG), resolution (e.g. 1920 x 1080), frame rate.
Audio : codec (AAC / G711A / G711U / G726 / G722 / OPUS), sample rate, channels.
URL : the full media address.
13. Connection status and auto-reconnect
The video surface shows status text while connecting or on errors: Connecting, Connect failed, NO Signal, NO Data, Authenticate failed, Invalid url.
The application automatically retries a failed/no-signal/no-data channel every 5 seconds until the stream is restored.
14. Configuration and logs
Persistent settings
All settings are stored via QSettings:
Windows: registry key HKCU\Software\happytimesoft\mediaclient.
Linux: ~/.config/happytimesoft/mediaclient.conf.
This includes general options, network options, recording/snapshot paths, the current window layout, and each cell's URL/credentials.
Log files
When logging is enabled, log files are written to the application directory as mediaclient-YYYYMMDD_HHMMSS.log. There is no in-app log viewer — open the log file directly.
15. Keyboard and mouse shortcuts
Esc — exit grid full screen.
Esc — exit channel full screen.
Esc, Exit Wall button, toolbar Video wall button, or context menu Exit Video Wall — exit video wall.
Double-click — toggle channel full screen (disabled on the video wall).
Single click — select a channel.
Drag & drop — play a local file onto a channel.
Right-click — open a channel's context menu.
16. Frequently asked questions
Q: I entered a URL but the channel shows "Connect failed".
Check the address and credentials, and verify network reachability. The channel will retry automatically every 5 seconds.
Q: Why can't I seek in my stream?
Seeking works for local files and RTSP playback. Live streams (HTTP-FLV, MJPEG, RTMP, SRT) do not support seeking.
Q: Where are my snapshots/recordings?
In the folders set under System Settings → Recording. Files are named with the stream name and a timestamp.
Q: The language didn't change.
The language setting takes effect after the application is restarted.
Q: The video wall does not use all of my monitors.
Make sure the monitors are physically connected and each is checked Enable this screen in the Video Wall Setting dialog. A saved template that refers to a disconnected monitor is skipped automatically.
Q: Where can I find more help?
Click the Online Help button in the toolbar to open the online documentation.