
Products >> Online Help >> ONVIF Client User Manual
ONVIF Client User Manual
Content
1. Introduction
2. System requirements and installation
3. Main interface overview
4. Device management
5. Video playback
6. Device configuration
7. Events and alarms
8. Device maintenance
9. System settings
10. Web management interface
11. Bulk deployment tool
12. Video wall
13. Frequently asked questions
1. Introduction
ONVIF Client is a cross-platform network camera client tool based on the ONVIF protocol. It supports Windows, Linux, macOS, iOS and Android, and works with any ONVIF-compliant camera, NVR or other ONVIF device.
Supported ONVIF standards and services :
ONVIF Profile C, Profile G, Profile T, Profile Q
Media Service 1 and Media Service 2
Device, PTZ, Imaging, Event, Recording, Replay, Search, Receiver, DeviceIO
Thermal, Credential, Access Rules, Schedule, Provisioning, Security (ONVIF 25.12)
IPv4 / IPv6, HTTPS, Digest and WS-UsernameToken authentication
Key capabilities :
Automatic device discovery (WS-Discovery, IPv4 and IPv6)
Multi-channel live video playback with hardware decoding
Device configuration: time, network, image, encoding, OSD, PTZ presets, users, channels
Event subscription / polling and alarm actions
Recording search, playback and local recording
Embedded Web management interface (browser access)
Bulk deployment tool for integrators (batch add, template apply, firmware upgrade)
2. System requirements and installation
Operating system : Windows 10/11, Linux x86_64, macOS, iOS, Android
Hardware : Dual-core CPU or better; a GPU with hardware decoding improves multi-channel playback
Network : The client must be able to reach the ONVIF devices (same LAN or routed segment)
OpenSSL : Bundled with the application; no separate installation is required
Installation steps :
1. Copy / install the ONVIF Client package to a local directory.
2. Run the OnvifClient executable.
3. On the first launch the program automatically performs device discovery and loads any device list and video window layout that were saved previously.
Note : if a firewall prompts on first launch, allow inbound connections on the ports used by the client (device probe, event notify port, and the embedded Web manager port).
3. Main interface overview
The main window is composed of the following areas, as following:
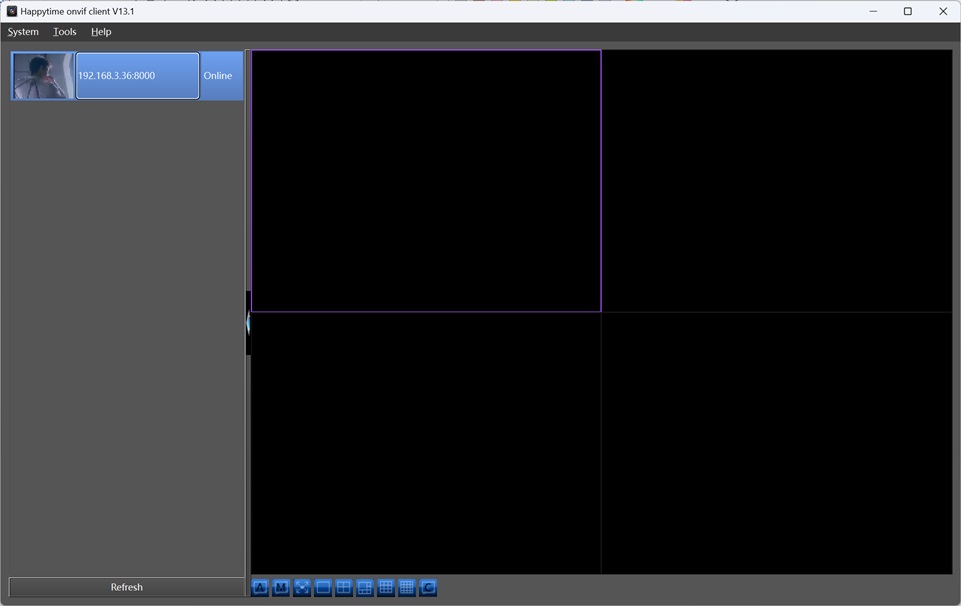
Menu bar : System (system settings, Web manager), Tools (bulk deployment), Help (About / online help)
Device list : Left tree view listing added and discovered devices with their online status
Video window area : 1/4/6/9/16-grid video windows; double-click a device to play it
System tray : The client can be minimized to the tray while playback continues
Menus :
System : System settings... (application-wide options), Open web manager (opens the embedded Web management interface), Video poll settings... (configure channel polling), Start video poll (start/stop automatic channel polling)
Tools : Bulk deployment... (opens the bulk deployment tool), Video wall... (configures and enters the video wall, see Section 12)
Help : About... (version and home page), Online help (online documentation)
4. Device management
4.1 Adding a device manually : Right-click the device list and choose Add device..., then fill in the IP address (or domain name), ONVIF service port (default 80), username, password, and check HTTPS to connect securely, as
following: 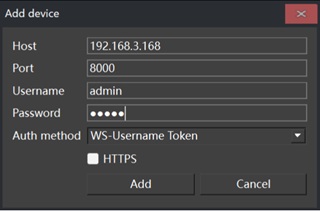
Note : The port is the onvif protocol port, not the http or rtsp port. After adding, the client automatically retrieves the device capabilities, profiles and stream URIs.
4.2 Device discovery (auto search) : The client automatically discovers ONVIF devices on the LAN using WS-Discovery. Discovered devices appear in the device list. To keep discovery working:
The probe interval is configurable in system settings (default 30 seconds).
Use System settings → Save automatically discovered devices to keep discovered devices after restart.
Note : The onvif client and the device should be in the same LAN, and can normally receive and send multicast messages.
4.3 Modifying / deleting devices :
Modify device : change the IP, port, HTTPS and credentials of the selected device.
Delete device : remove the selected device.
Clear devices : remove all devices from the list.
4.4 Importing / exporting the device list : Export device list... saves the current device list (including event actions) to an XML file; Import device list... loads devices from an XML file exported previously.
4.5 Refreshing device information : For an online device, the right-click menu provides Refresh. It sets the device to be updated and re-fetches device time, capabilities, configurations, stream URIs and snapshot.
4.6 Device status : The device list shows Online / Offline state. If authentication fails, the device is marked with Auth failed. Use Set login user to update the account and password, or right-click Modify device, as
following: 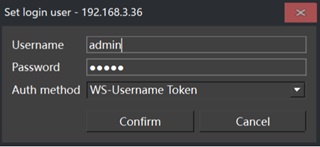
4.7 Set login user : Use Set login user to change the account used to access the selected device.
5. Video playback
5.1 Starting playback : Double-click a device (or a specific channel) in the device list to play its video in the selected window. The client supports H.264, H.265, MPEG-4, MJPEG and audio streams over:
RTP over UDP
RTP over TCP
RTSP over HTTP / HTTPS
RTSP over WebSocket
SRTP / RTSPS
The transport preference is configured in system settings.
5.2 Window layouts : Switch between 1, 4, 6, 9 or 16-grid layouts. Custom layouts can be saved and loaded from System settings → Video window layout. Video windows support drag-and-drop repositioning and PTZ synchronization between windows.
5.3 Video window controls : Right-click a video window (or use the on-screen toolbar) for:
Play / Pause / Stop : control the stream playback
Play stream ... : choose the playback source of this window (a device channel or an RTSP URL)
Snapshot : save the current frame as a JPEG file
Record : start / stop local recording
Mute / Volume : control audio output
Microphone : two-way audio talk-back (ONVIF audio backchannel)
Fullscreen : switch the window to full screen
Fill whole window : scale video to fill the window
Keep aspect ratio : keep the original aspect ratio
Media info : show stream / codec information
Copy URL : copy the stream URL of the current window
5.4 Snapshot : Toolbar Snapshot button or device right-click Get Snapshot. Images are saved to the configured snapshot path (default <appdir>/snapshot).
5.5 Local recording : Use the Record button to start/stop local recording. Files are saved to the configured record path (default <appdir>/record). Configure the maximum recording time and maximum file size in system settings. If a
device disconnects and reconnects, recording resumes automatically.
5.6 Audio and talk-back : Mute / Volume control the local playback volume. Microphone enables talk-back: the local microphone audio is encoded and sent to the device through the ONVIF audio backchannel. Select the capture device in system settings, as
following: 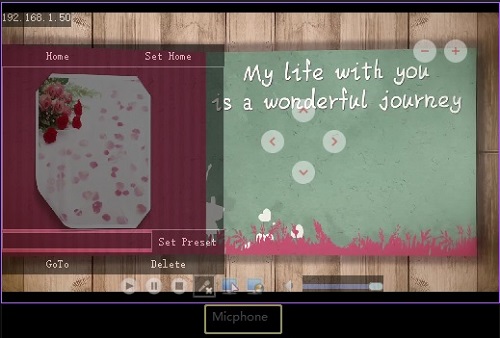
5.7 PTZ control : When the device supports PTZ: pan, tilt and zoom using the PTZ controls or mouse; focus (auto / manual, relative and absolute moves, focus window); Presets manager to save, recall and delete presets and configure preset tours, as
following: 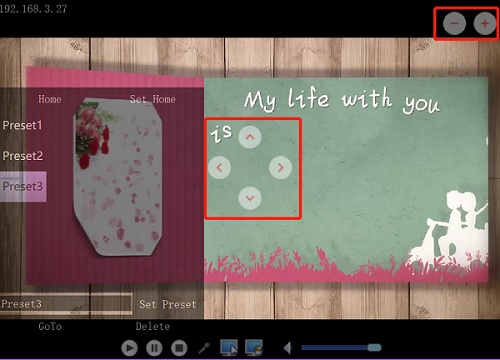
5.8 Video polling : System → Video poll settings... configures the number of polling windows and the interval. System → Start video poll begins cycling through the selected channels automatically, as following: 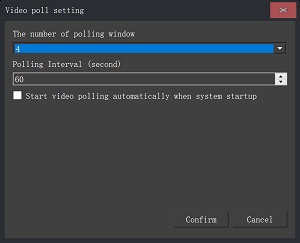
6. Device configuration
For an online device, the right-click menu exposes the following configuration dialogs. The client reads the device capability set and only enables the items the device supports, as following: 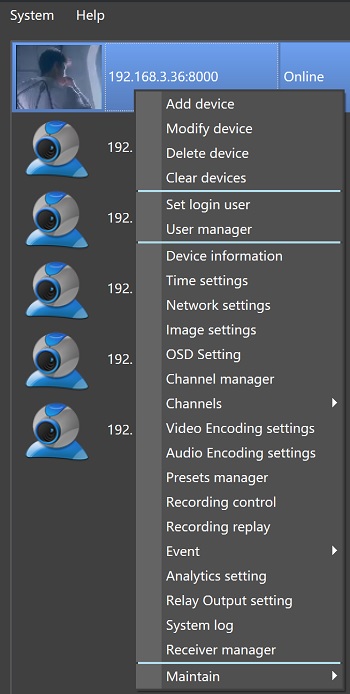
6.1 Device Information : Shows the device manufacturer, model, firmware version, serial number, capability set, and per-channel media information including stream URIs.
6.2 Time Settings : View the current device time and time type (local / UTC). Set the device time manually or synchronize with NTP.
6.3 Network Settings : Interface (IP address, subnet mask, IPv4/IPv6, DHCP, interface enable); default gateway (IPv4 / IPv6); hostname and hostname-from-DHCP; DNS servers and from-DHCP; NTP servers and from-DHCP; protocols (HTTP / HTTPS / RTSP enable and
port); dynamic DNS and zero configuration (if supported).
Note : changing the network settings may disconnect the device. The client can monitor the device Hello message and refresh the interface when it comes back online.
6.4 Image Settings : Adjustable parameters (those supported by the device): brightness, contrast, color saturation, sharpness; white balance (auto / manual); backlight compensation (on / off); wide dynamic range (WDR); exposure mode, priority, window, gain,
exposure time, iris; focus (auto / manual, default speed, near/far limits); IR-cut filter (auto / on / off).
6.5 Encoding Settings : Configure the video encoder (Media 2 is preferred if the device supports it; otherwise Media 1): encoding (H.264 / H.265 / JPEG / MPEG-4); resolution (from the device-supported list); frame rate, encoding interval; bit rate (kbps); GOP
length; quality; encoding profile (Baseline / Main / Extended / High). Audio encoder settings are also available for compatible devices.
6.6 OSD Settings : Add / edit text overlays on the video stream, using the Media 1 or Media 2 OSD interfaces.
6.7 Presets Manager : Save, recall and delete PTZ presets, and configure preset tours.
6.8 User Manager : View the device user list; add, delete and modify users with privilege levels Administrator / Operator / User.
6.9 Channel Manager : View per-channel video source, encoder, image and analytics configuration details, and select which channel is used by each video window.
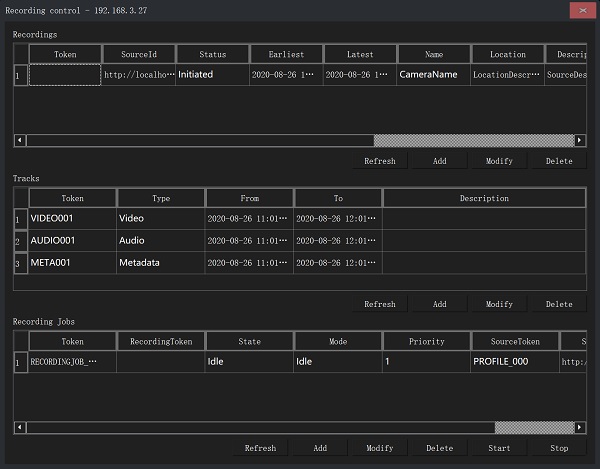
6.10 Recording Control and Replay : Recording control lists device recordings and recording jobs; create / delete recordings and jobs. Recording replay searches recordings by time range and plays them back in a video window, as following:
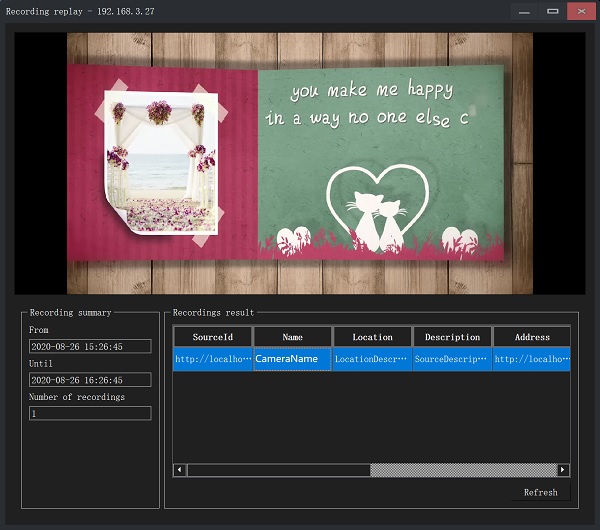
6.11 Relay Output : Configure and trigger the device relay outputs.
6.12 Video Analytics : Configure motion regions, rule engine and other analytics parameters.
6.13 System Log : Retrieve and display the device system log.
6.14 Receiver Manager : Manage RTSP receiver configurations on the device.
7. Events and alarms
7.1 Event Subscribe / Poll : Event subscribe subscribes to device event notifications; the client automatically sends a Renew request before the subscription expires. Event poll uses a WS-PullPoint to poll events if the device supports
it. Enable Automatic subscribe events in system settings to subscribe automatically when a device comes online, as following: 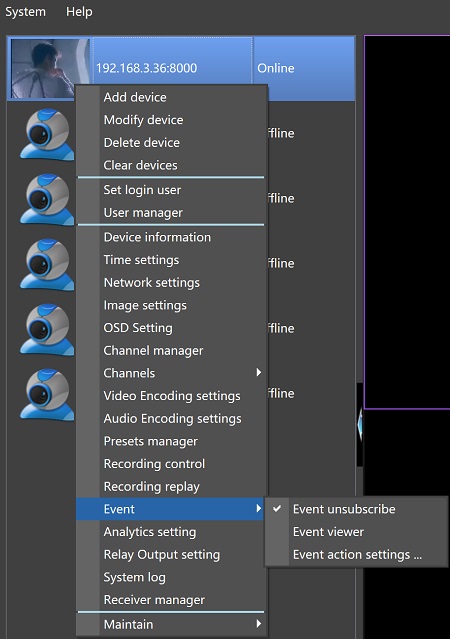
7.2 Event Viewer : Displays received events with time, device, topic and detail information, as following: 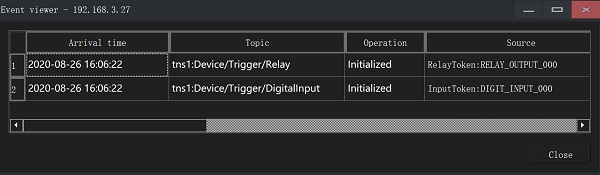
7.3 Event Actions : Configure actions triggered by events, for example jump to a PTZ preset when a motion-detect event occurs, or call an external program.
7.4 Motion Detect Popup : With the popup option enabled in system settings, the client automatically pops up the video window of the device that reported a motion-detect event.
8. Device maintenance
The Maintain submenu of the device right-click menu provides:
Reboot : Reboot the device
Soft reset : Restore factory defaults while keeping the basic network settings
Hard reset : Restore factory defaults for all parameters
System backup : Download a configuration backup file from the device
System restore : Restore the device configuration from a backup file
Firmware upgrade : Upload and install a new firmware file
Caution : firmware upgrade and hard reset can interrupt the device and take several minutes. Do not power off the device during these operations.
9. System settings
Open with System → System settings.... The dialog is organized into groups, as following: 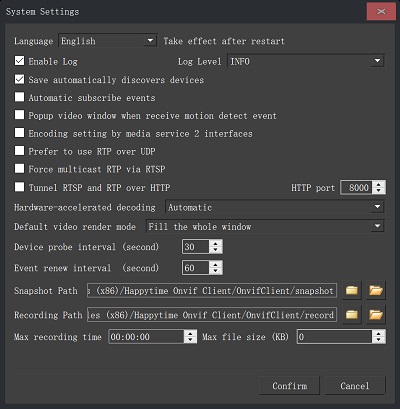
General
Language : System / English / Chinese (takes effect after restart)
Default video render mode : Keep aspect ratio, or fill the whole window
Audio capture device : Microphone used for talk-back
Hardware-accelerated decoding : Automatic / platform decoder / disable
Network and Transport
Device probe interval (second) : Interval for WS-Discovery probes (default 30)
Event renew interval (second) : Interval for event subscription renew (default 60)
Save automatically discovered devices : Keep discovered devices after restart
Prefer to use RTP over UDP : Prefer UDP transport for streaming
Force multicast RTP via RTSP : Force multicast RTP
Tunnel RTSP and RTP over HTTP : Use RTSP over HTTP (+ HTTP port)
Request metadata channel data : Enable metadata stream reception
Events
Automatic subscribe events
Popup video window when receiving a motion-detect event
Encoding setting by media service 2 interfaces
Recording
Snapshot path / Recording path (with browse and open buttons)
Max recording time
Max file size (KB)
Logging
Enable Log
Log level (TRACE ... FATAL)
Video Window Layout
Save Layout / Load Layout
Embedded Web manager
Enable embedded Web manager
Port (default 18080)
Account / Password (default admin / admin)
Note : changes to the Web manager take effect after the application is restarted.
10. Web management interface
The client includes an embedded Web server. Open a browser at http://<host-IP>:<port> (default port 18080) to manage the client remotely, as following:
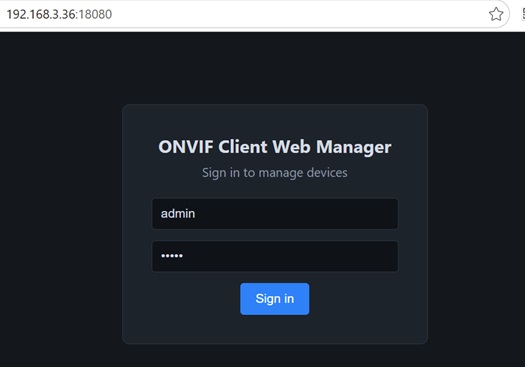
10.1 Login : Sign in with the Web manager account (default admin / admin). A session token is kept for the duration of the session.
10.2 Dashboard : Shows the total / online / offline device counts, server time, and a device status list.
10.3 Devices : Lists all devices with IP, port, type, state, authentication status and stream URI. Add / Edit / Delete devices. Settings opens the per-device configuration dialog (Encoding / Image / Network / Users). Live opens the live
view for the device.
10.4 Live View : Select a device and click Start to view live video (based on snapshot polling). Snapshot captures a single frame in a new tab. Stop stops the live view. Offline devices are reported immediately with a message.
10.5 Events : Displays recent ONVIF event notifications (time, device, topic, detail).
10.6 Settings : Enable / disable the Web server; port, account and password. Note: port changes require restarting the application.
10.7 Device Settings : Click Settings for a device in the device list to open its configuration:
Encoding : Encoding type, resolution, frame rate, bit rate, GOP, quality, profile (Media 2 preferred)
Image : Brightness, contrast, saturation, sharpness, white balance, backlight, WDR, exposure, IR-cut
Network : Interface IP/mask/DHCP, gateway, hostname, DNS, NTP, HTTP/HTTPS/RTSP ports
Users : Device user list; add / edit / delete users
11. Bulk deployment tool
Open with Tools → Bulk deployment.... This tool is intended for integrators managing many cameras, as following:
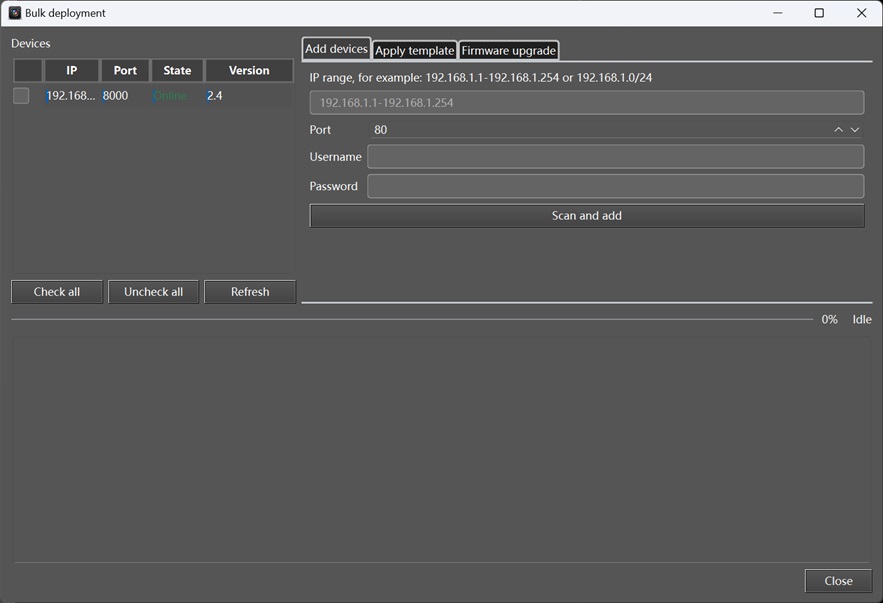
11.1 Device Table : Lists all devices with IP, port, online state and firmware version. Use the checkboxes to select devices for operations, plus Check all / Uncheck all / Refresh buttons.
11.2 Add Devices (Batch) : Enter an IP range, e.g. 192.168.1.1-192.168.1.254, 192.168.1.1-254 or 192.168.1.0/24. Enter the port (default 80), username and password. Click Scan and add: the client probes each
address and adds reachable ONVIF devices.
11.3 Apply Template : Load or paste a JSON configuration template, then click Apply to checked devices to push the settings to each selected device. Encoding is applied through Media 2 when supported, otherwise Media 1:
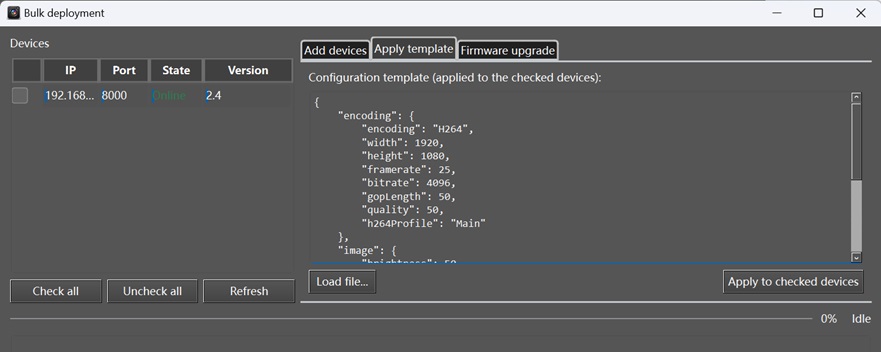
11.4 Firmware Upgrade : Select the firmware file with Browse.... Click Upgrade checked devices. Offline devices are skipped automatically.
11.5 Task Log : The log area at the bottom shows the progress and the result for every device in real time.
12. Video wall
The video wall spreads live video over multiple physical monitors. Each monitor becomes a frameless full-screen "surface" hosting its own video grid, so a control room can build a large video wall from several screens, as following:
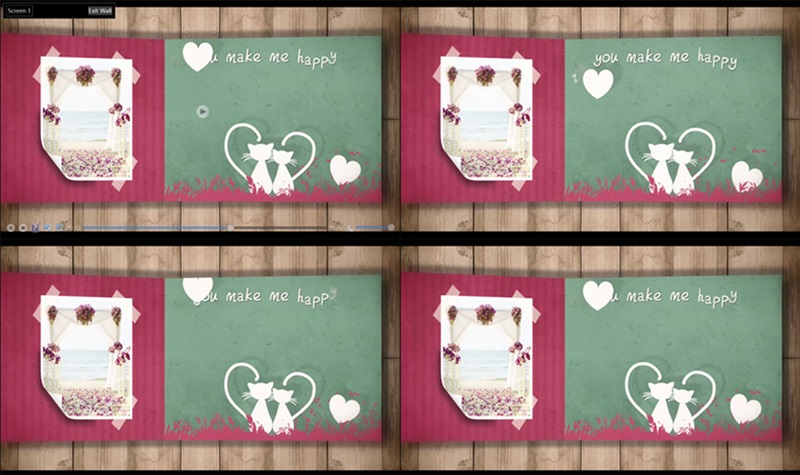
12.1 Opening the video wall : Choose Tools → Video wall.... The wall can be entered at any time:
If video is already playing in the main window, the running video windows are automatically moved to the wall (matched to their channels when possible).
If nothing is playing, the wall simply shows empty cells that you can fill afterwards.
Note : the video wall needs more than one monitor to be useful; it also works on a single monitor, but then it behaves like a full-screen grid.
12.2 Configuring the wall : In the Video Wall Setting dialog:
1. Select a monitor by clicking one of the rectangles drawn at the top (they represent the physical monitors).
2. For the selected monitor: enable the screen (Enable this screen); set the grid Rows and Cols (up to 5 x 5 per screen); set the bezel compensation (left / right / top / bottom in pixels) if the monitors have thick bezels, so
the picture is not hidden behind them, as following:
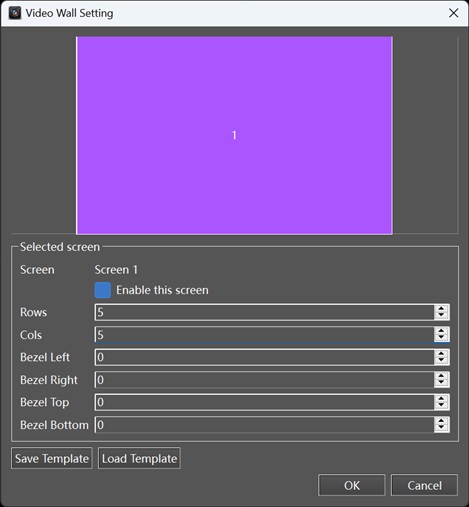
3. Configure the other monitors the same way.
4. Optionally Save Template / Load Template to reuse the layout later.
5. Click OK to enter the wall.
12.3 Playing video on the wall :
Already playing before entering : the current video windows are moved automatically onto the wall. Entering the wall with live video is the recommended way to build the wall quickly.
Fill an empty cell : right-click any cell and choose Play stream ...; then either pick a channel of an added device, or type an RTSP URL, and double-click the channel (or click OK). The video starts in that cell. This also works on the main
window's empty cells.
Each wall surface shows a small overlay in the top-left corner with the screen number and an Exit Wall button.
12.4 Leaving the video wall : Click Exit Wall on any surface, or press Esc:
Video windows that belong to cells of the main window are moved back and continue playing in their original positions.
Video windows that were started only on the wall (with no corresponding main-window cell) are closed automatically.
Stop / Mute all (Stop all videos, Mute all) act on the whole wall while it is active.
Note : the wall layout template saves the screen/grid/bezel settings; it does not save which channels are assigned to each cell.
13. Frequently asked questions
Device shows offline : Check network connectivity, the device port and credentials; confirm the device ONVIF service is enabled
Auth failed : Right-click the device → Set login user and update the username / password
Video cannot play : Switch the RTP transport mode (RTP over UDP / TCP, or RTSP over HTTP) in system settings
No audio or talk-back fails : Check the audio capture device in system settings and confirm the device supports the audio backchannel
Web manager is unreachable : Confirm the Web server is enabled and the port is free; restart the application after changing the port
Live view shows no image : The device may be offline or require authentication; verify the device supports the snapshot interface
Batch add is slow : Scanning probes each address one by one; narrow the IP range for faster scans
Video poll does not start : Check the poll settings and that at least one channel is configured