
Products >> Online Help >> SRT Client User Manual
SRT Client User Manual
Content
1. Introduction
2. Main features
3. Main window overview
4. Playing an SRT stream
5. Video window controls
6. Video window layouts
7. Video wall
8. Snapshot and recording
9. System settings
10. Media information
11. Status messages and automatic reconnection
12. Online help and languages
13. Frequently asked questions
1. Introduction
Happytime SRT Client is a desktop application for receiving and playing SRT (Secure Reliable Transport) live streams. It supports multiple video windows, several predefined and fully custom window layouts, a multi-monitor video wall, snapshot
capture, video recording, hardware-accelerated decoding, automatic reconnection, and multi-language support.
This manual describes the desktop (Windows / Linux / macOS) version, version V2.9.
2. Main features
Play SRT streams (srt://...), including streams that require a username and password.
Up to 16 video windows in the predefined layouts (1 / 4 / 6 / 9 / 16), plus a fully custom layout editor.
Video wall mode that spans several physical monitors (up to 4 screens), each with its own grid (up to 5 × 5 cells) and bezel compensation.
Per-window playback controls: play / pause / stop, volume, mute, snapshot, recording, and a seek progress bar.
Full screen playback with a single or double click.
Video snapshot (JPEG) and recording (AVI).
Hardware-accelerated decoding with automatic selection or explicit mode.
Automatic reconnection when the connection fails or the signal is lost.
Media information dialog (codecs, resolution, frame rate, sample rate, channels).
Multi-language UI (English / Chinese / system language).
Layouts and system settings are saved and restored automatically.
3. Main window overview
The main window is titled Happytime srt client and consists of two parts:
Video display area — the grid of video windows in the center.
Toolbar — the icon bar at the bottom.
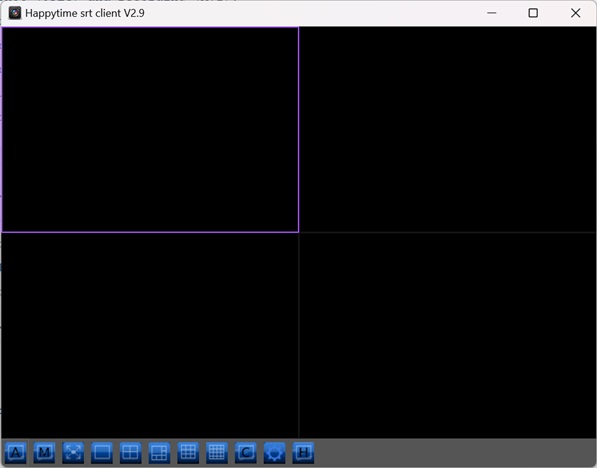
Toolbar buttons :
 : Stop all videos — close every playing video window (including the video wall, if active) at once.
 : Mute all videos — mute the audio of all video windows (including the video wall).
 : Full screen — display the whole video area full screen.
 : One — switch to a single-window layout.
 : Four — switch to a 2×2 (four-window) layout.
 : Six — switch to a six-window layout.
 : Nine — switch to a 3×3 (nine-window) layout.
 : Sixteen — switch to a 4×4 (sixteen-window) layout.
 : Custom Layout — open the custom layout editor.
 : Video wall — enter / exit the multi-monitor video wall mode (see Section 7).
 : System setting — open the System Settings dialog.
 : Online help — open the online documentation in the browser.
When the video area is displayed full screen, press Esc to return to the normal window.
4. Playing an SRT stream
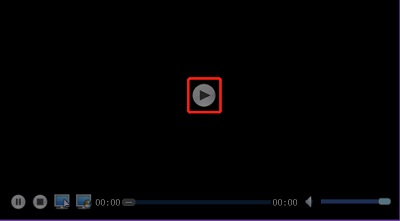
1. Hover the mouse over an idle (empty) video window. A floating control bar with a large Play button appears, as the following:
2. Click the Play button. The Set srt url dialog opens, as the following:
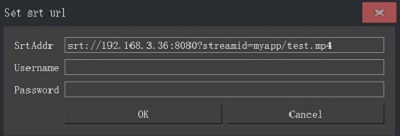
SrtAddr — the SRT URL, e.g. srt://192.168.1.100:9000
Username — optional user name required by the stream
Password — optional password (masked)
3. Enter the URL and, if required, the user name and password, then click OK.
Rules for the URL :
The address must start with srt://, otherwise an error is reported.
The address cannot be empty.
While the stream is being opened, the window shows status messages such as Connecting. Once the video is decoded it is displayed immediately. Audio, if present, is played through the default output device.
5. Video window controls
When you move the mouse over a video window, a semi-transparent floating control bar appears at the bottom of the window, as the following:
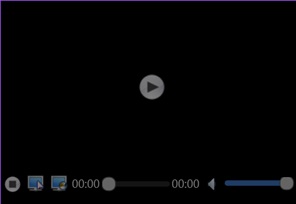
It automatically hides when the mouse moves away.
Floating control bar :
Play / Pause button — toggle play / pause. When the window is idle this button opens the "Set srt url" dialog.
Stop — stop and close the current stream.
Snapshot — save a JPEG snapshot of the current frame.
Record — start / stop recording the stream.
Elapsed time — current playback position (00:00).
Progress slider — playback progress; drag it to seek (available on replay / recorded streams).
Duration — total duration of the stream (00:00).
Volume button — toggle mute on / off.
Volume slider — adjust the volume (0 – 255).
Right-click menu :
Close Video — close the stream in this window.
Fill the whole window / Keep the original aspect ratio — switch the rendering mode of this window. (Only the mode that is not active is shown.)
Full Screen / Exit Full Screen — enter / leave full screen for this single window.
Media information ... — open the media information dialog (see Section 10).
When the video wall is active (see Section 7), the menu instead shows an Exit Video Wall entry at the top, and the full-screen entries are hidden.
Full screen :
Double-click a video window, or use the Full Screen entry in the right-click menu, to display that window full screen.
Press Esc to restore the normal window.
Full screen is only possible when the main window itself is not full screen, and it is disabled while the video wall is active.
Selecting a window :
Click a video window to select it. The selected window is marked with a purple border. Only one window is selected at a time.
6. Video window layouts
Predefined layouts
Use the toolbar buttons 1 / 4 / 6 / 9 / 16 to arrange the video area as one, four, six, nine or sixteen windows.
Custom layout
Click Custom Layout on the toolbar, as the following:
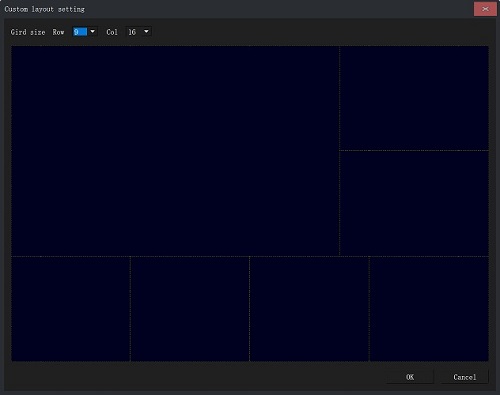
1. In the Custom layout setting dialog choose the Gird size — the number of Row(s) and Col(s).
2. Draw the desired zones by dragging on the grid preview.
3. Click OK to apply, or Cancel to discard.
The layout is applied to the video area immediately.
Save / restore
The current layout (including the URL, user name and password of every zone) is saved automatically when the application exits and restored automatically on the next start.
You can also save / load a layout explicitly from the System Settings dialog (see Section 9) using Save Layout / Load Layout. These store the layout in an XML file chosen with a file dialog.
7. Video wall
The video wall displays SRT streams across several physical monitors at the same time. Each monitor runs a full-screen wall surface with its own video grid, so the whole desktop behaves like a TV wall, as the following:
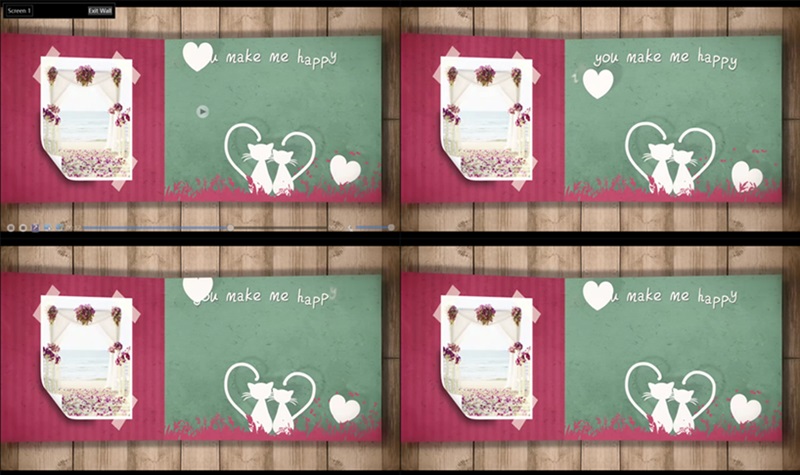
Entering the video wall :
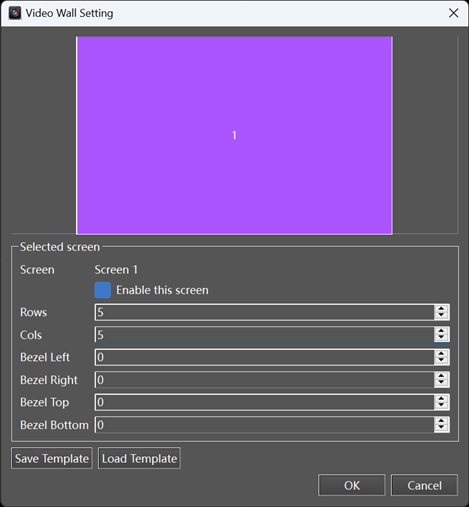
1. Click the Video wall button on the toolbar. The Video Wall Setting dialog opens, as the following:
2. Configure the screens (see below) and click OK.
3. If at least one screen is enabled, the main window hides and every enabled monitor becomes a full-screen, frameless video wall surface with the configured grid.
The streams that were already playing in the main window are not stopped: they are moved onto the wall while it is active and are restored to the main window when you leave the wall. Empty wall cells can be used to start new streams exactly as in the normal window (hover,
click Play, enter the SRT URL).
Video Wall Setting dialog :
The top of the dialog shows the physical monitor arrangement. Click a monitor to select it (the selected monitor is highlighted). For the selected screen you can set:
Screen : the number of the selected monitor (Screen 1, Screen 2, ...).
Enable this screen : use this monitor as part of the wall.
Rows : number of rows in the grid on this screen (1 – 5).
Cols : number of columns in the grid on this screen (1 – 5).
Bezel Left / Right / Top / Bottom : bezel compensation in pixels (0 – 200) for each edge.
Bezel compensation shrinks the video content area on that screen by the given number of pixels. Use it on walls built from monitors with bezels so that the picture edges align across adjacent panels.
Buttons: Save Template saves the whole wall configuration (enabled screens, grids and bezel values) to an XML file; Load Template loads a previously saved wall configuration; OK applies the configuration and enters the wall; Cancel discards it.
While the wall is active :
Every enabled monitor shows its full-screen wall surface on a dark background. In the top-left corner of each screen an overlay shows Screen N and an Exit Wall button.
Wall screens can hold up to 5 × 5 = 25 windows each.
If there are more running streams than free cells on the wall, the surplus streams are kept paused-safe (not stopped); they reappear when the wall is exited.
Stop all videos and Mute all videos on the toolbar also affect the wall.
Per-window playback controls (play / pause / stop, snapshot, record, volume) and the right-click menu (Close Video, render mode, Media information) remain available on each wall cell. Full screen for a single window is disabled while the wall is active.
Exiting the video wall :
You can leave the wall in any of the following ways:
Press Esc (on any screen).
Click the Exit Wall button in the overlay of any screen.
Right-click any video window on the wall and choose Exit Video Wall.
When you exit: every stream that was running on the wall is restored to the main window without interruption, in the layout the main window had before the wall was entered. Streams that were started only on the wall (with no free cell to return to in the main window) are
closed. The main window is shown again.
8. Snapshot and recording
Snapshot
Click the Snapshot button on the floating control bar. The current frame is saved as a JPEG file in the snapshot folder. A message box reports the save path on success, or warns you to check the path on failure.
The default snapshot folder is snapshot/ next to the executable. You can change it in the System Settings dialog.
Recording
Click the Record button to start recording the stream. The button changes to a stop icon while recording; click it again to stop.
Recordings are saved as AVI files in the recording folder.
The file name is derived from the stream host name.
If the stream is interrupted and automatically reconnects, recording resumes into a new file automatically.
You can limit the recording by time or by file size in the System Settings dialog (see below); when the limit is reached the file is split automatically.
The default recording folder is record/ next to the executable.
9. System settings
Click the System setting button on the toolbar. The settings are grouped into five sections, as the following:
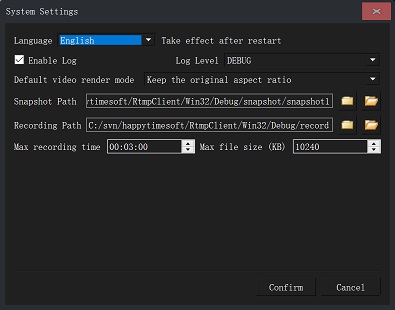
General
Language : UI language: System (follows the OS), English, or Chinese. Takes effect after restart.
Enable Log : Turn application logging on / off.
Log Level : Level of detail written to the log: TRACE / DEBUG / INFO / WARNING / ERROR / FATAL.
When logging is enabled, an srtclient log is written; the level is applied immediately after confirming.
Video
Hardware-accelerated decoding : Decoding acceleration mode: Automatic, a specific backend (e.g. Direct3D11, DXVA 2.0, Video Toolbox, OPENCL, MediaCodec, VAAPI) or Disable.
Default video render mode : Keep the original aspect ratio (letterbox) or Fill the whole window (crop to fill).
The render mode applies to newly opened windows; you can still switch the mode of an individual window from its right-click menu.
Paths
Snapshot Path : Folder where snapshots are saved. Use the browse folder button to pick a folder, or the open button to view the current folder.
Recording Path : Folder where recordings are saved (with the same browse / open buttons).
Recording
Max recording time : Maximum length of one recording file (HH:mm:ss). Recording files are split when the time limit is reached.
Max file size (KB) : Maximum size of one recording file in kilobytes. Recording files are split when the size limit is reached.
Setting a value of 00:00:00 for the time and 0 for the size means no limit.
Video Window Layout
Save Layout — save the current layout (zones plus stream addresses) to an XML file.
Load Layout — load a previously saved layout from an XML file and apply it.
After editing the settings, click Confirm to save them or Cancel to discard. Changes to the language require restarting the application.
10. Media information
Choose Media information ... from a video window's right-click menu. The dialog shows, as the following:
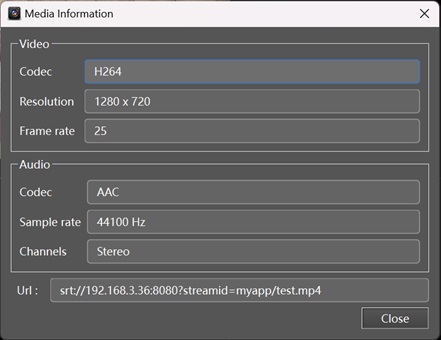
Video : codec, resolution, frame rate.
Audio : codec, sample rate, channels.
Url : the address of the current stream.
Supported codecs include H.264, H.265/HEVC, MPEG-4 and JPEG (MJPEG) video, and AAC, G.711 A/U, G.726, G.722 and Opus audio.
11. Status messages and automatic reconnection
During playback the window may display the following status text:
Connecting — the client is establishing the SRT connection
Connect failed — could not connect to the server; retrying after 5 seconds
NO Signal — the connection was lost; retrying after 5 seconds
NO Data — no data received; retrying after 5 seconds
Authenticate failed — the server rejected the user name / password
Invalid srt url — the address is not a valid SRT URL
If the connection fails, is lost, or the signal stops, the client reconnects automatically every 5 seconds until playback resumes.
12. Online help and languages
Click the Online help button on the toolbar to open the SRT Client online documentation in the default browser.
The interface can be switched between English and Chinese from System Settings → Language. The Chinese translation is loaded from srtclient_zh.qm next to the executable; when you choose System, the language follows the
operating system locale (Chinese systems use Chinese automatically).
13. Frequently asked questions
Q: The program reports "Invalid srt url".
The address must start with srt://, for example srt://192.168.1.100:9000.
Q: The video shows "NO Signal" / "NO Data" repeatedly.
The client is retrying every 5 seconds. Check the server, the network and the stream address. If the stream requires a password, verify the user name and password in the "Set srt url" dialog (click Play on that window to change them).
Q: Where are my snapshots / recordings?
By default in the snapshot/ and record/ folders next to the executable. You can change both folders in System Settings → Paths, and open them with the open folder buttons there.
Q: Why does the language not change after I select it?
The language change takes effect after restarting the application.
Q: My layout keeps changing back to the previous one.
The layout is saved when you close the application and restored on the next start. To keep the current layout permanently, use System Settings → Video Window Layout → Save Layout, or simply close the application after arranging the windows.
Q: The Video wall button does not seem to do anything.
Make sure at least one screen is enabled in the Video Wall Setting dialog. On a single-monitor computer, enable the only screen and choose the desired grid rows / columns.
Q: Why is part of the picture cut off on my wall, or the picture edges do not line up between monitors?
If the monitors have bezels, enter the wall configuration again and set Bezel values for the affected edges of each screen. The content area is inset by that amount so that pictures align across panels.
Q: What happens to my streams when I leave the video wall?
Streams that were playing are moved back to the main window and keep playing. Streams that were started only on the wall are closed when they cannot fit into the main-window layout.